Ziploc Ranch Chicken

Monday, December 7, 2020


It never fails. You buy a box of corn flakes for one recipe or because it was on sale. But do you actually eat them? Not us. It sits in the pantry and is overlooked every morning. But did you know that corn flakes are great for baking with? They crush and cook so nicely and add the perfect crunch to anything. 

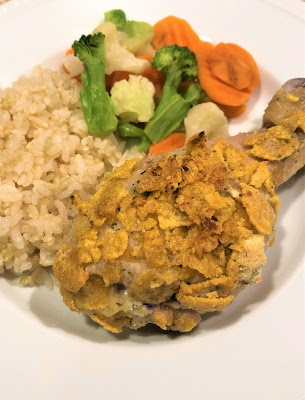
Like chicken. Tonight I'm taking those cornflakes and using them as a delicious coating for chicken drumsticks. A fried chicken alternative, if you will. Quickly mix up ranch seasoning and "green shaker cheese" (parmesan) and shake onto fresh chicken. Your family will love the flavor. And they'll love eating with their fingers. 

mix directly into ziploc bag, in bowl for picture 

I'm not one to love working with raw chicken, but I'm willing to do it here. The flavor that chicken drumsticks give is well worth it. I have made this coating for chicken tenders and it works just fine. But I urge you to go ahead and take time to trim the skin on and prep the drumsticks. After that it's just a drop in the bag. 

Once your chicken is ready, I like to lay it on in a dish or on a foil lined pan. Drizzle pieces with butter. Butter? Well there's an ingredient you haven't seen me include yet! I do use it sparingly. And a little goes a long ways here so 1/4 cup is all you need! You can roll the pieces around a little in the dish to evenly coat. Plus it provides a buttery, nonstick surface on the pan. 

Sprinkle leftovers from the ziploc bag on to the chicken before baking 


Wash your hands and then mix up the dry ingredients in a handy, dandy...ziploc bag!  Drop each chicken piece into bag one at a time. Give a good shake and coat/crush the cereal using your hands on outside of bag to coat as much of the chicken as possible. Lay each piece in dish.

Once all coated, back uncovered in dish for about 40 minutes, or until golden and internal temp reaches 160 degrees. 

Serve with a simple side.  All the flavor of a bucket of chicken without the grease. Mouthwatering Mondays made easy.

Happy eating, friends!

xo,

Brit

Ziploc Ranch Chicken

Ingredients

2 pounds chicken drumsticks (~ 8 pieces)
1/4 cup butter, melted
1/2 cup parmesan cheese
1 1/2 cups corn flakes
1 packet dry ranch dressing mix

Instructions:

1. Preheat oven to 350 degrees. Line pan with foil, if neccessary
2. Drizzle washed, trimmed and dried chicken with melted butter 
3. Combine cheese, corn flakes and dressing mix in ziploc bag, coat chicken
4. Bake uncovered for 40 minutes or until golden


Read More

Corn Casserole

Wednesday, November 25, 2020


So I got inspired today thanks to a post I did yesterday on Facebook. It asked-- "what is ONE Thanksgiving food that makes you lose all control?" Two of my friends brought up cornbread casserole. I had to think about this for minute but realized this is what I've always known simply as corn casserole. 

Corn Casserole is a staple for holidays with my mom . And she'll often whip it up for a cookout as it's easy and everyone eats it up.

I'm not sure I've ever made it, to be honest. We like Jiffy Muffin Mix and we like corn. So today I thought in the spirit of Thanksgiving week, I'm making Corn Casserole!


I skipped the butter and used an easy pre-portioned substitute for the sour cream.  A carton of plain greek yogurt. Also knowing that my family inhales anything with corn, I wanted to add a little color (*cough* spinach) into it as well. I grabbed a handful from my freezer (freeze your fresh spinach!) and crumbled it into the batter. Another fun way to get extra nutrition. And adds variation to this "yellow" recipe. 

Mix it all together and bake to golden brown.  I used a 9x9 baking dish and it's actually a little thicker than my mom's. This is also likely to the greek yogurt, just shy of a cup, which is usually the traditional amount of sour cream.  But no complaints here. In fact, more compliments than anything!  My husband noted that it's more like cornbread on top and then soufflé like on the inside. Yum!

Healthier, easier AND all the taste you expect. 

Enjoy!

xo, 
Brit


Corn Casserole 

Ingredients:

1 carton of plain greek yogurt (individual size, 5.3 oz) 

1 egg

1 can creamed corn

1 can sweet corn (drained)

1 box Jiffy Corn muffin mix

1 cup of crumbled spinach 

Dash of salt and pepper, optional 


Instructions:

1. Preheat oven to 350 degrees and spray 9x9 casserole dish with non-stick spray

2. Pour all ingredients, except spinach, into bowl and mix until well combined. Crumble spinach into mix and stir in. 

3. Pour into baking dish and bake for 45-55 minutes, or until top is lightly golden brown 

Notes

  • A friend highly recommends topping this with cheese
  • Variations can be made based on thickness-- use larger pan for thinner, just adjust baking time


Read More

Pesto Baked Salmon

Tuesday, November 10, 2020


Craving salmon? Pesto Baked Salmon is a 5 ingredient meal ready in minutes!  Stock up on salmon burgers. I'll show you how you can go from frozen to flavorful in about 15 minutes. 

Schedule a night for salmon. It tastes great and is widely available. And it's health benefits are undeniable. Those omega-3 fatty acids are superb from lowering inflammation, decreasing blood pressure and fighting cancers. In addition, you're getting B vitamins, folic acid and selenium. All wrapped into an excellent source of protein. 

And using frozen salmon burgers is ideal for you, mama. No planning ahead. No slicing a raw salmon fillet into individual portions. Easy to store and cost effective. But even more, I use these to my advantage. I've found my family they readily accepts anything in the shape of a burger. So it's a win-win. Easier to prep and easier to get them to eat. 


I'm featuring these Salmon Burgers from Trader Joe's.  Each box comes with 4 individual vacuumed sealed filets.  Make one, or make 4.  You can grill, pan fry, bake, or even microwave. Love that kind of flexibility! 

Here I'm spooning on a jarred pesto, topping with a tomato and sprinkling with a topping that turns a bit crunchy. So many delicious flavors and textures. Quick enough for a Monday. Tastes like a night out!

Enjoy!  


Ingredients:

1 box salmon burgers (4 burgers)

4 tablespoons pesto

4 tomato slices/pieces

1/4 cup breadcrumbs

1/4 cup shredded parmesan cheese


Instructions:

1. Preheat oven to 400 degrees. Line pan with foil and spray with non-stick spray. Lay salmon burgers on pan.

2. Spoon 1 TBSP of pesto on each filet and spread with back of spoon. Top with tomato slice. 

3. In small bowl combine parmesan cheese and breadcrumbs until evenly mixed. Top each burger with coating of breadcrumb mixture.

4. Cook the salmon for 10-15 mintues

5. Serve immediately 


Notes

  • When spooning pesto onto frozen salmon, avoid spreading and dipping back into jar. 
  • Use more or less pesto per preference
  • Can sprinkle with a bit more cheese upon serving

Read More

Healthy Habit: Say your Prayers...and Meditate

Thursday, October 8, 2020


I'm kicking off my Healthy Habit posts for October with a topic that makes up a part of my everyday wellness. That is prayer. And since this month is Pregnancy and Infant Loss Awareness Month, I thought I'd share a set of verses that are very dear to my heart.   

Five years ago I relied on these words as survival. Yet today, I still find myself calling on these verses in even the better times.  

Yes, prayer is paramount to my faith and spiritual beliefs. But even more, the act of meditation through prayer helps me find peace and promotes positive living.

These 10 verses not only guide my prayer but have taught me the following:

Faith and Fear cannot exist in the same place

I mentioned these prayers as survival. Fall 2015, I found myself through a wave of emotions. After suffering two pregnancy losses and then finding out we were expecting again, anxiety dictated much of my days.  For example, every time I'd arrive to to the physician's office, I stood paralyzed in fear. Fear that silence would be found on the screen. Fear that the tech would again say,  "I'm sorry but it appears the heart has stopped beating." 

To help fight against the fear, I'd pull up my phone with this image and with white knuckles, get lost meditating over these verses until my name was called. 

You know what? I'd find peace. Calm. My stomach would settle, my breathing would normalize.  Through my faith, I found moments of comfort and clarity. 

And it wasn't just coincidence. There are many benefits to prayer and meditation.

Why is it important to pray and/or meditate?

  • Reduces stress A few minutes in prayer can allow you to escape the worries of life and find peace within your daily life
  • Control over thoughts Keeping peace through prayer pushes out negative thoughts and helps prioritize daily hurdles 
  • Improved health  It can calm anxiety, lower blood pressure, give mental clarity. It can also bring a sense of closeness to self and a higher being
  • Personally, it's important for my spiritual wellness. I give thanks and ask for guidance from my creator, the one who is ultimately in control 

I've shared these prayers with friends as they navigated their way through pregnancies. And I thought it was important to share here because you do not necessarily have to be experiencing loss or pregnancy to find joy in these verses.

In fact, 2020 stirred up the importance of these verses.  I think we can all use some faith over fear right now. Do you agree?

So no matter what you walk through may you always remember that faith and fear cannot co-exist. When we choose faith through prayer and meditation, we push fear out and live more positive, peaceful and healthier lives. 

XO,

Brit


To print out a PDF version of these scriptures or learn more about faith based resources for moms and families, visit Gather&Grow.


Read More

Even Better Tomato Soup

Monday, October 5, 2020


Hi ya! I have to say that I've been craving soup the past couple days. The temperature has been brisk and I love the idea of a hearty soup for lunch or dinner.

One of my favorite soups growing up was tomato soup. Nothing fancy, just the good ol' Campbell's Tomato soup. My mom would make it with 1 can of milk in place of water for extra creaminess. On occasion, she'd toss some cooked elbow macaroni noodles in. Yum! That paired with a grilled cheese was so delicious!

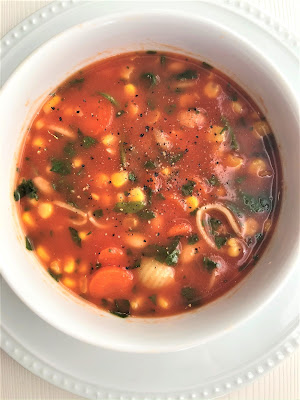
I'm sharing my own makeover for tomato soup today. It's so easy but a great way to get those veggies in and create a bit more nutrition.  Plus, you have the rich taste of tomato soup as a base. So much more appealing than boring vegetable soup from a can. 


This tastes closer to a soup that's been simmering all day but done in 5 minutes. Oh and nothing has to be prepped. Just open and dump, stir and heat. 

All you need:

  • canned soup
  • canned veggies 
  • canned beans 
  • cooked pasta or grain
  • spinach leaves

And you know me. I'm back to talk about frozen spinach. Are you doing this trick yet? Please do. Here is another perfect example where you can reach into the freezer, grab a heaping handful of frozen spinach leaves and crumble it right into the soup. Boom. A serving of super greens without washing, chopping or gnawing on raw leaves. 

A family pleaser with so much nutrition-- veggies, beans, greens. You can add in whatever you like. Including a protein.  

And I love this because one can of soup ($0.99) now feeds a family and for about the same cost of one of the fancier, healthier canned soups.  

I made this soup and turned around and put the remainder of canned veggies and beans right into the crockpot with some chicken and salsa. Love multi-tasking and no wasting. 

Happy Monday, Friends!


Even Better Tomato Soup


Ingredients:


1- 10.75 oz Campbell's Tomato Soup
1 cup Great Northern Beans
1 cup canned corn
1 cup canned carrots
1 cup precooked pasta noodles
1-2 cups frozen spinach leaves

Instructions:


1. Prepare soup as directed on can in saucepan.
2. Add in all other canned ingredients and stir, warming over medium heat
3. When soup is warmed, toss in cooked pasta and crumble frozen spinach leaves
4. Allow to simmer for a couple more minutes, stirring.

Sprinkle with pepper per taste, serve and enjoy! 
Read More

Peanut Butter Swirled Pumpkin Brownies

Thursday, October 1, 2020


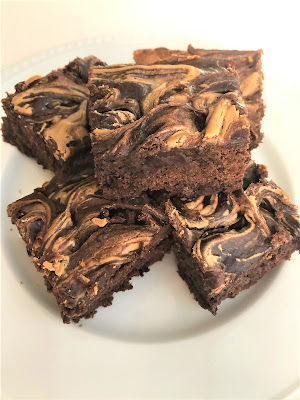
Happy October! Let's start the month off with... chocolate! These thick, rich brownies are the perfect way to blend the season with your favorite weakness. Swirl in a bit of peanut butter, sprinkle with some salty goodness and Fall. In. Love. 

You all know I love mixing pumpkin in with cake mix-- one of the best shortcuts I've ever learned. Check out these easy muffins as a reminder.

Pumpkin is such a powerhouse of nutrition and while seasonally accepted, it honestly should be celebrated and enjoyed all throughout the year!  Pumpkin offers so many benefits. It's an immunity booster, supports eye/bone health, aids digestion and promotes skin health.  And the great thing about it is that the flavor blends into chocolate seamlessly. 

So, for all of you out there thinking pumpkin is a bit...basic, here's the good news--you don't even have to taste it! 

I will say as easy as mixing pumpkin and chocolate are, I actually wanted to taste the pumpkin. Tis the season right?! So in went the pumpkin spice and vanilla extract. And while dreaming of a hint of savory with sea salt or peanut butter, the answer came quick,"Why not both?" (Thanks, BG!)

I introduce to you the easiest, healthier way to eat pumpkin and brownie-- Peanut Butter Swirled Pumpkin Brownies.

Enjoy!


Peanut Butter Swirled Pumpkin Brownies

Ingredients:

1 box Chocolate Brownie Mix ( highly recommend Specialty Selected Double Chocolate with chocolate chips from ALDI)
1 cup 100% Pumpkin Puree 
1/4 cup Water
1/4 cup Creamy Peanut Butter
1 tsp Vanilla Extract
1 tsp Pumpkin Spice
Additional PB to drizzle (optional)
Flaky Sea Salt ( optional... but not really)

Instructions:

1. Preheat oven to 350 degrees, lightly grease 9-inch square baking dish

2. In a mixing bowl, mix brownie mix, pumpkin puree, and water until well blended. Stir in peanut butter.

3. Add the pumpkin spice, vanilla extract and stir until well combined

4. Pour the batter into prepared dish and shake/spread with spatula to even out. Drizzle extra peanut butter on top and swirl using knife or toothpick, making marble design with brownie batter. 

5. Bake for 35 minutes, or until toothpick comes out clean. Remove from oven and let cool. Sprinkle with flaky sea salt, cut and serve.

Notes:

  • Store in fridge for 3-4 days


Read More

Spinach & Kale Greek Yogurt Dip Lasagna Roll Ups

Monday, September 21, 2020

YOU GUYS. I don't usually toot my own horn but this is one recipe that I'm pretty darn excited about. I've transformed my favorite Trader Joe's spinach dip into an amazing filling for my lasagna roll ups! The quickest way to a pan of pasta to enjoy this week.

I'm always taking my favorites and thinking about how I can use them differently. This dip is no exception! I devour it right out of the carton but I've always thought it had just a wee bit more potential. And clearly, it does! 

Have you had this dip before? It's the Spinach and Kale Dip from Trader Joe's. THE BEST. This decadent mixture is blended with everything you love about typical spinach dip.   Plus, water chestnuts, red peppers, carrots, green onions and garlic. But don't let that turn you off. You have to try it!  It truly does not taste super "veggie" or healthy.

Healthier way to eat spinach dip, found in refrigerated section at TJs. 

These lasagna roll ups have 6 main ingredients, require very little prep and hit the spot! Mixing my favorite dip in with chicken creates all the flavor and color of other spinach roll ups but without the time chopping, measuring or adding extra seasoning, liquid, etc.  Add in a dollop of ricotta cheese and the creaminess blends perfectly with the firm cooked noodles.  Everything you'd want from a lasagna. And they're nutritious! 

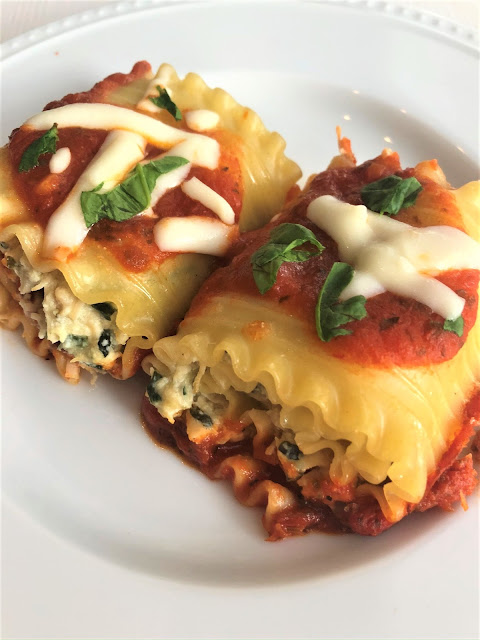
Never eaten lasagna roll ups?  You're missing out. The filling rolls up perfectly into individual lasagna noodles. Lay them in a dish with some sauce, cover with foil and bake. It's such a great way to enjoy pasta. And the part is-- you can make it ahead of time!  

Boil noodles, mix up the filling and roll them up. At this point you can choose to 1) bake now in oven 2) store in refrigerator until mealtime or 3) freeze the pan for a great make ahead meal.

It's so easy!!  Use your favorite chicken and piece, shred, dice-- anything goes! The best shortcut to for meat is canned chicken (drained). And it's delicious! It mixes up so well with NO effort and prep. I'm telling ya, if you don't stock this in your pantry, please try it here. 

I definitely recommend a small amount of ricotta but to be honest, the first couple times I made this, I didn't use any.  But I will say when warmed, the dip had just a bit of a sour taste (probably due to the greek yogurt and small amount of mayonnaise). It wasn't bad, but I think the ricotta cancels out the tang. Plus, it gives a bit more of a traditional lasagna taste that we all love. 

When you remove from the oven, you can sprinkle a tiny bit of mozzarella cheese and fresh spinach on each roll. Replace the foil and let sit for a couple minutes. The heat melts the cheese, wilts the spinach and adds color plus a bit more nutrition. 

Alright. This definitely is one of my favorite meal makeovers. I knew my family loved lasagna roll ups and loved this dip. And I loved getting creative. I hope you love them too!

And great thing--you still have the rest of the spinach and kale dip to devour. Or to make another family friendly recipe with. Stay tuned ;)

xo, 

Brit

Spinach & Kale Greek Yogurt Dip Lasagna Roll Ups

Ingredients:

3 cups chopped cooked chicken
1 cup Spinach & Kale Greek Yogurt Dip from Trader Joe's
1 cup ricotta cheese (part skim)
1/4 cup grated parmesan cheese
2 cups marinara sauce
10 lasagna noodles
Olive oil, mozzarella cheese, fresh spinach pieces, optional

Instructions:

1. Boil lasagna noodles per instructions on package. Drain, lightly drizzle with olive oil to avoid sticking and lay flat on pan
2. In bowl, combine chicken, dip, ricotta and parmesan cheese
3. Spread 1/3 cup mixture on each lasagna noodle and roll jelly-roll fashion
4. Pour and spread 1 cup  marinara sauce into bottom of baking dish
5. Arrange lasagna rolls, seam-side down in sauce in dish
6. Top with remaining marinara sauce
7. Cover with foil and bake at 375 degrees F for 30 minutes or until hot (sauce will bubble)
8. Top with mozzarella cheese, fresh spinach, recover for 1-2 minutes
9. Uncover and serve

Notes:
  • Sub your favorite white sauce for marinara for a completely different look/taste!
Read More