
Today I'm stepping out of the kitchen and sharing another hobby that brings me joy-- celebrating special occasions. I love hosting parties and have way too much fun with the details. To set the stage here, I'm that girl that threw her dog a birthday party complete with "Golden" Ceasar Salad, Chicken "doodle" soup and "pawty" sandwiches. If you didn't pick up on the subtle hints, she's a golden doodle. She's also my first baby and deserved to wear that a party hat.
Anyways, as my son's 4th birthday approaches this week, I can't help but to reminisce last year's party. A celebration sans COVID. No knowledge of social distancing or worrying about the weather because we need to celebrate outside. Isn't it crazy how different our thoughts are today?
When it comes to the party details, I'm not one to order custom invites, napkins and balloon arches. While all that is swoon worthy, part of my love of hosting is getting creative. I love brainstorming and late night scrolling for "pin-spiration." I then take those ideas and think how I could craft or use items that I already have to achieve the same look. This saves me a lot of running around and money too!
Bobby's third birthday was the first "event" that I hosted in our new home. And while I've gotten my party planning down to a science (knowing what my strengths are and what should be store bought), a new space always throws a bit of a curve ball. I have to say, however, it was probably the easiest and perhaps most enjoyable party I've done to date. I credit having a system for the planning. Today I'll walk you through those four steps. I tend to stick to the same things within the following categories:
- Invitations
- Decorations
- Dessert
- Food
With cars as the theme (the actual vroom-vroom, beep-beep type, not the Disney Pixar type), I revved up my engine and got to work.
Invitations
For invitations Greeting Island is my go-to. Using my phone, I customize a invitation template within minutes. I then spend an additional minute saving the image and texting or emailing it out to family and friends. BOOM. Invites done.I love this site because not only do the designs feel very personalized, but grandparents can still print a physical copy to display on their fridge. And what a time saver for me! No making invitations, writing out envelopes and worrying about having them in the mail by a certain date. I also find that people tend to respond to a text, making the guest count a breeze. Oh, did I mention this service is free? I also saved on postage.
 |
| Invitation courtesy of GreetingIsland.com-- just customize and send |
Decorations
I always stick to the two same areas for decorating-- the fireplace and the dining room. The fireplace is obviously in the heart of the home and where we open presents and take pictures. And I fancy up the the dining room sideboard to display the cake and desserts. With two main focal points, the space feels festive without streamers and balloons hanging from every room.Now this is where i get crafty and DIY. I love making banners and decor. It's such fun way to add personal touches to any event. And it's so EASY.
Here, I printed out a car image (google.com) and traced a "stencil" onto cardboard. I then cut out the cars, wheels and windows from paper. After gluing the car parts together, I hung each car to the string secured on the mantel. I included a number '3' in the middle to complete the banner. I also made a few extra paper cars to use as table decoration.
Supplies I always keep on hand: pack of 12x12 scrapbook paper/cardstock in assorted colors, jute twine (or burlap string), mini clothespins, glue stick and tape or 3m Command hanging hooks.
 |
| Image courtesy of google images |
 |
| Paper cars made from scrapbook paper |
What did I use as my stencil for the stoplight circles you ask? My Fiestaware appetizer plates. No kidding. Over the years, I've learned that the 6.5" diameter plate is perfect for serving salads and... creating banners. Now it also makes great traffic lights!
A few other quick details completed the fireplace. I printed a speed limit sign (google images), painted a 'B' on a random canvas I had, and added race flags (Hobby Lobby party aisle) in a mason jar. I jazzed up the play table with black road play tape (also hobby lobby) and added a few toys. Decor that is FUNctional at a child's party is key!
 |
| Festive fireplace decor made from paper, boxes and items around the house |
The dining room sideboard was simple. I swapped out the seasonal decor in my tiered tray for car theme items-- flags, a book, a picture of my son dressed as a race car driver. Again, things I already had. I also used more paper cars from my mantel decor as table decoration. The desserts act as decoration too (more on that in a minute). And balloons add quick color and interest to any space.
Supplies I keep on hand: mini chalkboard stands to label dishes, mini photo holders to display decor or photos, and air filled foil balloons in numbers and initials (dollar store or Target).
 |
| Displaying desserts away from the food adds to the decoration |
Dessert
For the cake, the answer is always the same-- store bought. I use the local grocery store down the street who always produces beautiful, delicious, custom cakes. Very reasonable priced too! I show them a picture of what I want but then add my own touch to it. Here, I used toy cars that I also handed out as favors. I find ordering the cake as basic as possible keeps the cost down and allows me to incorporate my theme.My go-to cake order: 8" double layer cake with one layer white cake and one layer chocolate cake. It's pretty and absolutely delicious. I also prefer it for display purposes. It fits on my cake stand while the double layers maximize the amount of servings.
 |
| Add toys onto the purchased cake at home to save money |
Tip: refrigerate pan of brownies overnight for easy to cut rectangles
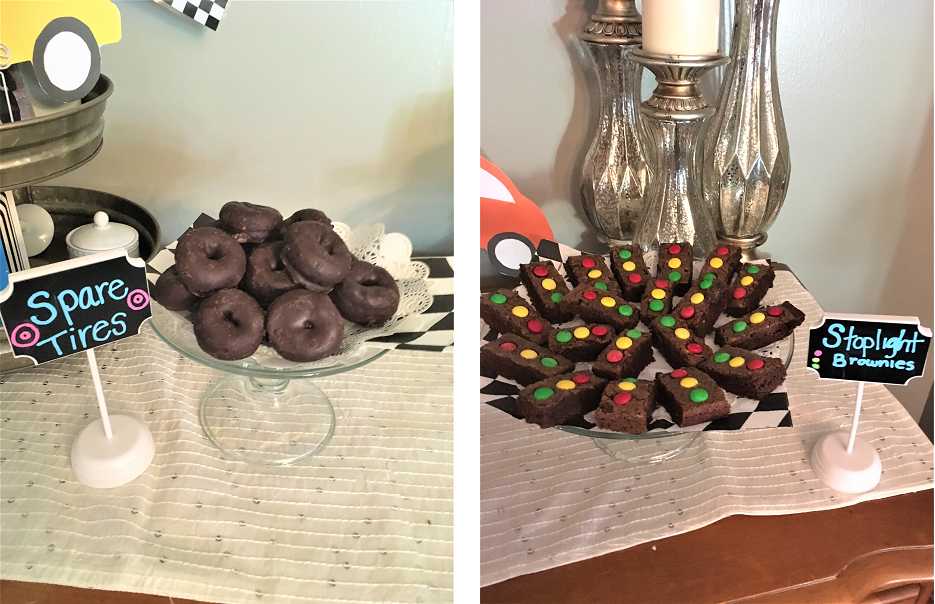 |
| Don't over complicate desserts--have fun with store bought items and colored candies |
Food
I may blog about food but this is one area I don't get too involved with for parties. Like the cake, I save myself the hassle of the prep, the mess, and the logistics of storage. And have you seen how much little kids can eat? It's much easier to open another bag of pretzels then try to plate a fancy creation.My number one go-to is a tray of sandwiches. Order an assortment and there's something for everyone. I do prefer to create my own fruit and vegetable trays. Store bought trays are great but they are often heavy on broccoli and cauliflower, which tends to be left behind. For side dishes, I stick basically chips, crackers and dip. I do re-plate as much as I can on platters and dishes. Looks great and so easy.
Tip for trays: Stick to just a couple fruits and veggies but alternate them on the tray. This creates a nice visual but is easy to manage. Also, wash and slice food the day before and store in containers. This makes for easy plating and easy cleanup-- just put any leftovers back in containers.
Related to serving, I usually hit up the dollar store or Walmart for tablecloths and paper goods. Both have great selections of colors and prints for a dollar or less. And I love nothing more than quick clean up. Roll up the mess with the tablecloth and toss it away.
 |
| Easy to serve and easy to eat food + plastic tablecloths for easy clean up |
So there you have it. Following the same steps within those four categories, I keep myself sane and also thoroughly enjoy the planning process. I had so much fun with his party that I actually hosted a play date the next day for his best buddies. This was a great way to bring out all the leftovers and continue the fun. The kids had a blast playing with the decorations--cars, flags, balloons, etc. And I had a blast knowing my efforts could provide so much joy. It was the perfect way to celebrate two ways for our number one kid.
I hope this post inspired you to get a little creative for your next event. While simple, these tips truly create something much bigger-- a celebration of love and laughter, memories and excitement. And no virus can take that happiness away. So, Bobby-- this year we'll don our party hats (er, masks?) and have a ball. Happy Birthday, buddy!

Post a Comment