Pork KaBOBBYs

Tuesday, August 11, 2020


Kabobs on the grill are fantastic. I do the prep and the husband cooks. Little does he know, he actually has the more time consuming part of this meal! Named after my little sous chef, I'm here to show you the quickest way to a flavorful, healthy, colorful dinner--KaBobbys.

We've been buying this Smithfield Fresh Pork Loin for awhile. It's one of those staple items I've found from Walmart Grocery and it's our favorite. It's a wonderful fresh, thick cut that is high quality and so, so flavorful. And this cut is just under two pounds but I get a couple meals out of it, making it extremely budget friendly.  In fact for this recipe, I cut the pork loin in half and froze the other section so that we can have dinner later on.  

The great thing about this pork loin is it's already marinated. So once I cut up my veggies, all I have to do is assemble the kabobs.  You can buy the pork unflavored and do your own marinade. But ya know, I love making easy EASIER! 

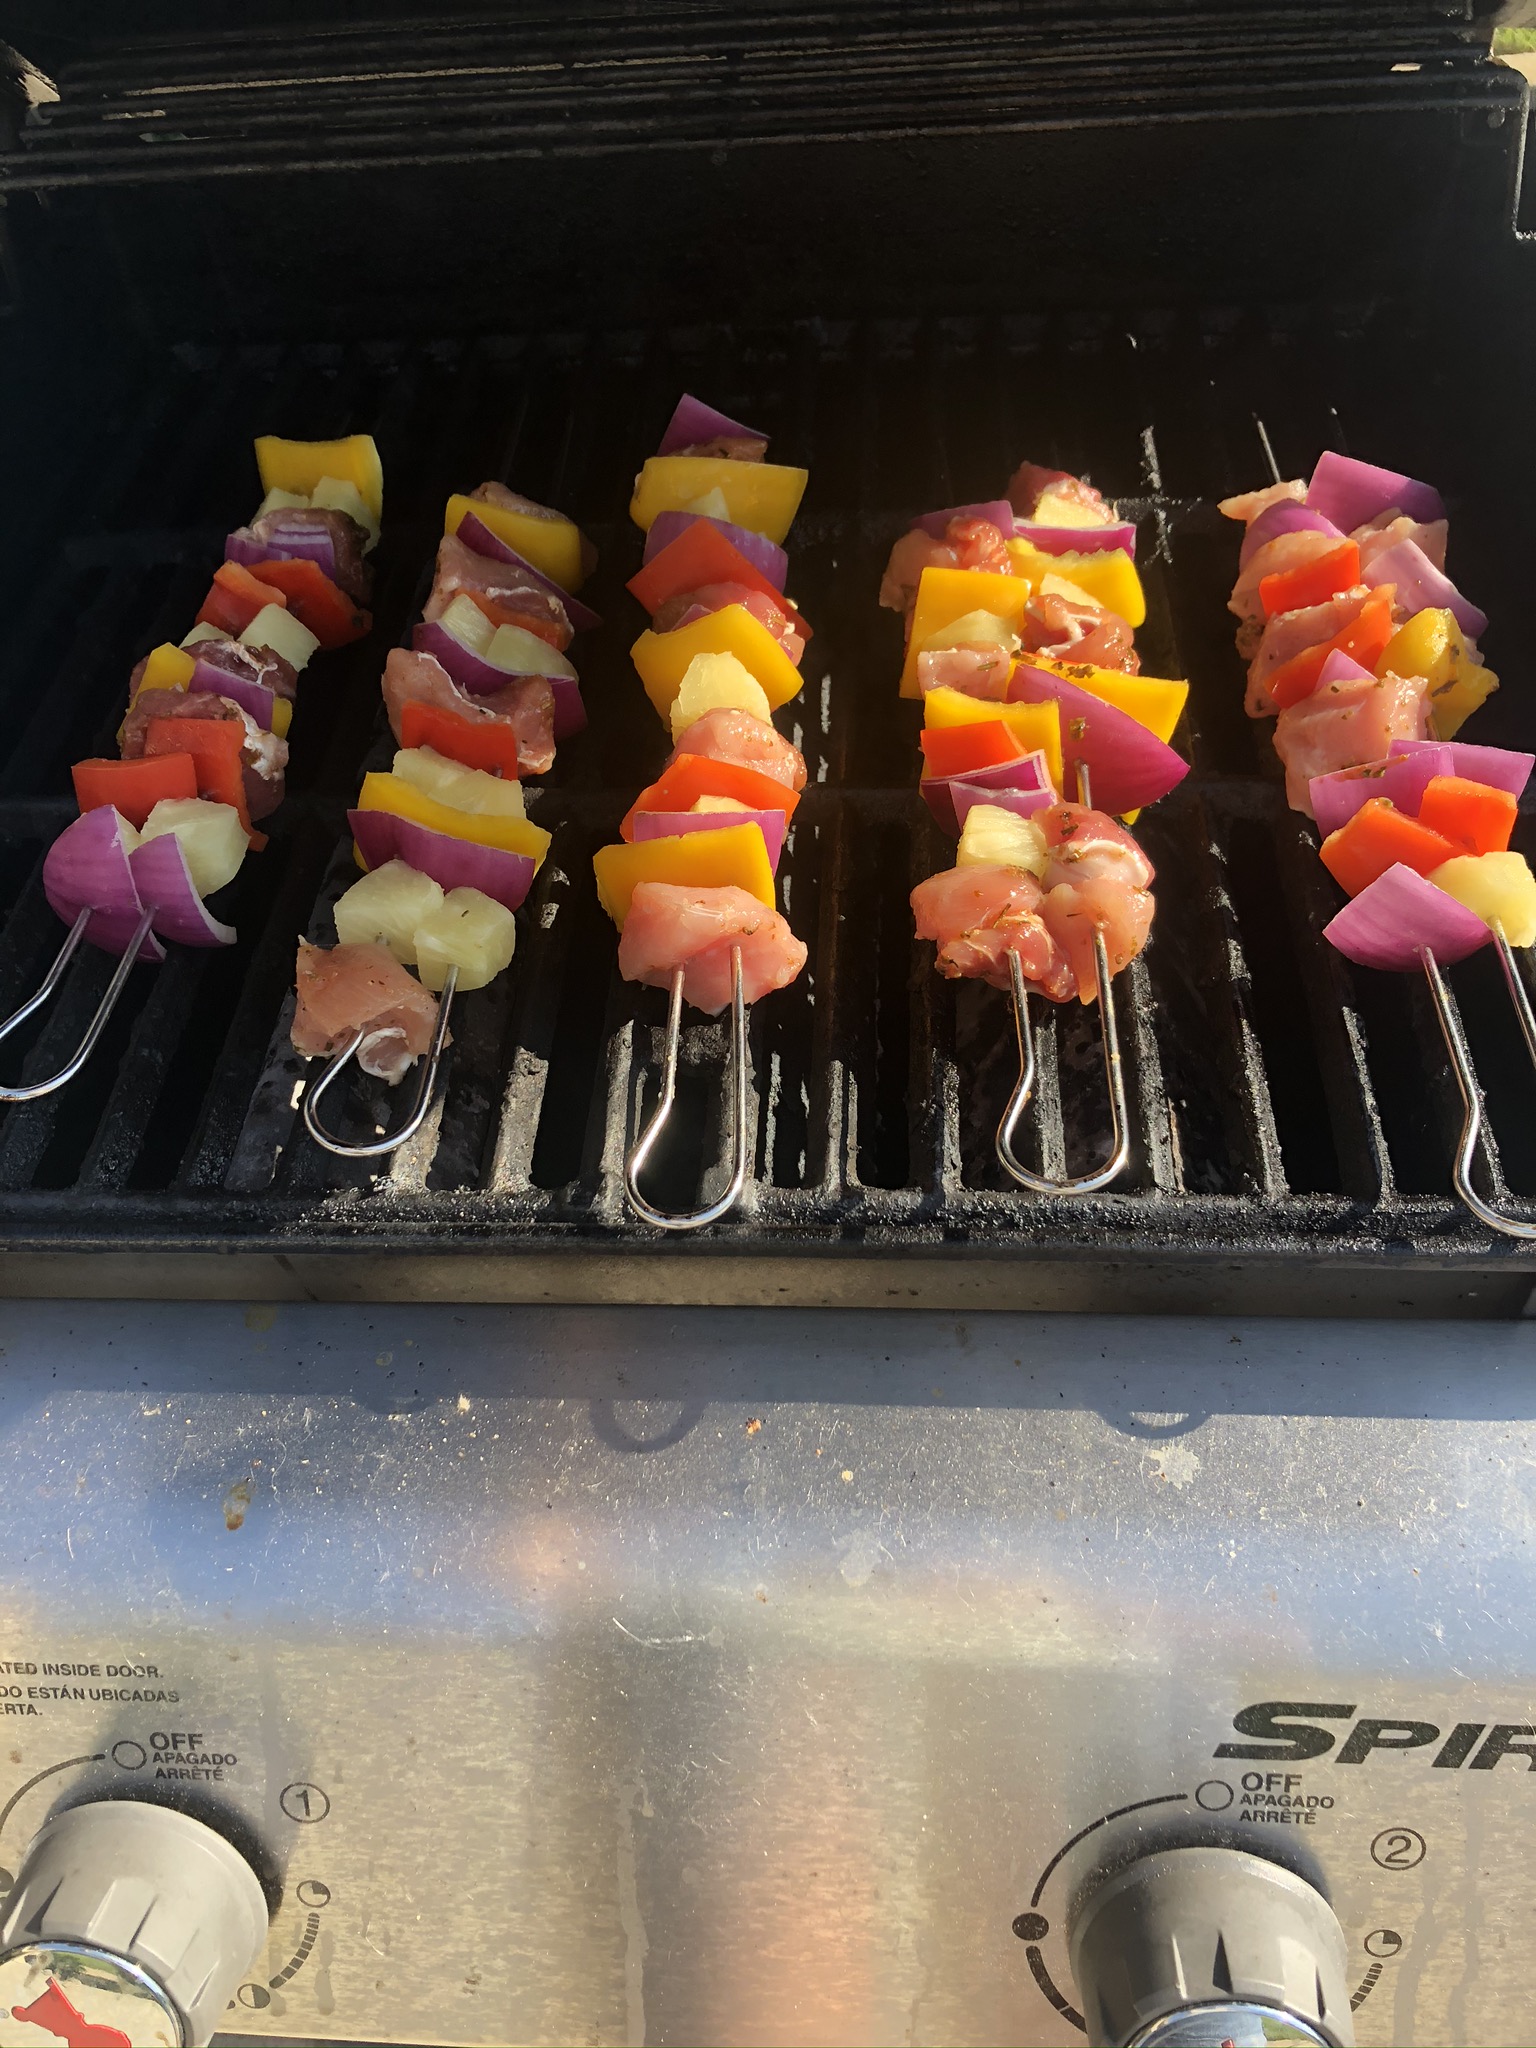
So here I used the Roasted Garlic and Herb Smithfield Fresh Boneless Pork Loin with yellow and red bell pepper, red onion and canned pineapple.  Such a desirable combination of juicy pork, crispy vegetables and sweet pineapple.  Obviously, you could use fresh pineapple for elevated flavor.  But since I don't necessarily have one sitting around on a given day, canned it is. You could also use any vegetables you have on hand-- tomatoes, squash, mushrooms, etc. 

Assembling these kabobs could not be more fun for my son and I to do together. I typically prep the ingredients during nap time. I cut the meat and veggies up in about 1 1/2 inch pieces. I open and drain the pineapple.  Then, once my son wakes, we stick it all on our metal skewers. I do most of the sticking, of course.  But he tells me what order for the colors and hands me the pieces. He also "taste tests" the peppers and pineapple to make sure I'm using only the finest ingredients.  

Dad then fires up the grill, cooks for about 15-20 minutes and a colorful, delicious meal is ready.  We love to dip in a bbq sauce (homemade or store bought).  I typically serve with brown rice (instant or Trader Joe's frozen and microwave ready in three minutes ).  

What I love most about this dinner is how it appeals to us adults but also easily serves the kids. I'll slide everything off the stick and slice/chop into smaller pieces as needed. The pork is easy to "shred" with a fork and knife for my toddler. 
Side note--these double skewers are a must have. They're stainless steel so no prep needed (wooden kabob skewers typically need to be soaked for 15 minutes prior to using) and they are dishwasher safe.  Love the double feature because you can assemble how you like.  They're from Crate and Barrel years ago (wedding registry item) but I'm sure they have a similar item. 

We always have some leftovers which I combine in a container or two for lunches. A scoop of rice, meat and colorful veggies, and sweet pineapple. What a fun way to meal prep too!

I'll keep you posted about how I prepare that other half of pork that I froze. Typically, I'll crock pot that portion and shred into sandwiches or tacos. But it's also wonderful to top with Pineapple Salsa.  

Pick up a pre-marinated pork loin on your next grocery haul. Snap a picture and tag me, @briefandbalanced. I'd love to see how you cook up your KaBobbys! 

xo, Brit


Pork KaBobbys

Ingredients:

2 large bell peppers

1/2 red onion

1 cup of pineapple chunks

1 pound of Smithfield seasoned Pork Loin 


Instructions:

1. Cut up pork, peppers and onion into 1 1/2 inch pieces. Drain canned pineapple 

2. Thread pork, bell pepper, onion and pineapple onto skewers

3. Place assembled kabobs onto heated grill at roughly 400 degrees

4. Cook kabobs for about 15 minutes, rotating every few minutes. 


Notes:

  • Spray grill with nonstick spray to ease cooking
  • This recipe uses half of pork loin (comes as 2 lb) but you can use more or less depending on preference


Read More

Chocolate Muffins

Saturday, August 8, 2020


Wow, you guys!! Can we talk about the weather this week?! Waking up to those crisp, cool mornings was intoxicating. I was so motivated to be productive-- as long as it meant windows open, sweatshirt on and coffee brewing. And nothing pairs better with that coffee than a warm chocolate muffin. This recipe is the easiest, yummiest way to get your chocolate fix. Tastes like a cake but offers far more nutrition. Regardless the weather, these always hit the spot!

I'm thrilled to feature this popular chocolate + pumpkin recipe on my blog because to me, it's the epitome of brief and balanced. Two ingredients (fast) and where healthy meets chocolate (balanced). This recipe reinforced my passion for ingredient swaps and simple baking in 2011. It certainly deserves a spot on this blog. 

And while chocolate is my love, the star here is the pumpkin. Do you know how amazing this fruit is?  It's considered a nutrient dense food meaning in each serving, you get the biggest bang for your buck. Low calorie, jam packed with vitamins, nutrients and disease reducing benefits. You can also call it an immunity booster thanks to the Vitamin A, C and iron and folate.

PSA: Stop making this superfood seasonal--Eat it often!!


And making this my own, I have added just one more punch of nutrition. Oatmeal!  Like our friend pumpkin, it blends in easily and offers so much beneficial nutrition.

The cool thing about adding the oatmeal (and water) into the mix is that the recipe yields more than the typical 12 regular sized muffins. Per directions, this makes 18 muffins. Why is this important?  Well, you're now eating less cake mix per serving.  Each muffin has approximately half the sugar of the serving suggestion on the label.  And don't forget we added protein, fiber, vitamins, minerals, antioxidants, etc. Kinda cool, huh?  This dessert is starting to sound more like a well balanced snack!

I know I say all my recipes are easy but this one is SUPER easy. Simply stir dry cake mix with canned pumpkin until well combined.  Pour in the water and dry oats.  Once mixed, spoon into the muffin tin and bake.  When cool to touch, you'll need to hide the muffins-- they will disappear! My husband will DEVOUR these gone. 

And here's a tip-- when combining the cake mix and pumpkin, I like to do in a specific order. First, add pumpkin (wet ingredient). Then add cake mix (dry ingredient) but in small amounts, stirring as you go. Otherwise, this combination is thick and can take some real muscle to get blended. Then add water and oats. I suppose if you're using a mixer, you can dump everything in and have a go.  But I still prefer to do this by hand. 

Such a simple recipe.  So many memories.  Chocolate + pumpkin, you have my heart! And now a space on this blog.  Enjoy!

xo, Brit


Chocolate Muffins

Ingredients

1 box chocolate cake mix
1 can (15 oz) canned pumpkin (NOT pumpkin pie mix)
1 cup of oatmeal
2/3 cup of water

Instructions
1. Preheat oven to 400 degrees and grease muffin tin or line with cupcake liners
2. Mix pumpkin, cake mix, water and oatmeal. Stir until well blended
3. Fill each muffin cup halfway full
4. Bake for 15-20 minutes

Notes
  • If you love oatmeal, you can definitely add more. Or sprinkle some on top.
  • Any flavor of cake mix can be used
  • Looking for even less sugar? Make into mini muffins for a bite size chocolate fix


Read More

Burger Bag Cheeseburgers

Thursday, July 30, 2020


Cheeseburgers are an absolute favorite in this house. My son could eat them everyday. Even when we order Mexican takeout and ask him "hard shell or soft shell taco?" His answer is always the same: "cheeseburber."

I'll never forget when I was preparing this dish one day and I was singing along with Jimmy Buffett to "Cheeseburger in Paradise." My (then almost three year old) son points to his face and in perfect tune sings "Cheeseburbers and a pair of eyeeees." It was one of those mom moments where you laugh so hard you cry and swear your kid could not be cuter. They say the best things, don't they?

Today I'm sharing the easiest (and healthiest!) way to our favorite meal. No need to patty the meat or start the grill. You simply BAKE the burgers.  These juicy patties are delicious enough for a weekend meal but simple enough for a weeknight dinner. 

Once you taste this twist on a classic, you'll never go back. And it's certainly faster than piling everyone into the car and ordering drive thru! 


Burger Bags:

Click here to follow my freezer trick for "Burger Bags." You'll have meat stocked and ready for when the craving hits.

This method preps the meat by freezing in an 8 inch square patty.  Once thawed, you'll prep your 8x8 baking dish, tear open the burger bag and flip meat into it. The fastest and cleanest way to handle raw meat!


Freeze meat like this and once thawed, flip into baking dish

A Better Burger


Burger: 

This recipe features ground turkey in place of hamburger, hence the "better" part.  The flavor is amazing here and it cooks in it's own juice so you don't have to worry about it drying out. But you can use any meat (and can never go wrong with the real stuff--80 or 85% lean ground beef). You'll drain or pat the grease off which will reduce some fat and calories anyways. 


Seasoning: 

Seasoning is the trick to healthier foods. You add in all the flavor without the fat, calories and sugars.  Here, sprinkling in hamburger seasoning transforms the ground turkey into the burger that you're craving.You could also swap in salt and pepper, especially if you choose to use ground beef. 


Cheese: 

Shredded cheese is great alternative to a big slice of cheese.  A sprinkle goes a long ways. You get the same melty goodness and you can adjust quantity. Plus, if someone orders 'no cheese,' no problem. Just sprinkle where you want it.  I typically use cheddar cheese but my mouth is watering thinking about the flavors of cheese you could toss on.  


Bun and toppings:

Customize the bun and toppings and make it even better. For example, use a whole wheat bun and use spinach leaves in the place of lettuce. Pile on veggies and top with your favorite condiment. 


Preparation:

The technique is quite simple-- sprinkle onion and seasoning into dish, press in the meat, poke holes, and bake to perfection.


Once done, you'll sprinkle on cheese and bake for another couple minutes until cheese is melted. 

Have fun with this recipe.  Since they're baked in a dish you can choose how to cut them. We've done everything from big burgers, small sliders or our most creative-- long skinny burgers that fit on hot dog buns. Such a fun way for kids to eat a burger!

If I'm looking for a way to use up some some meat, I'll make this recipe and store dish in fridge.  Cut portions throughout week as needed. With that fantastic cheeseburger flavor, you can even put it on a salad, too!


Burgers make a delicious, balanced meal. The meat provides vital nutrients like protein, zinc, and B-vitamins ( B6, B12) and more. Add crisp veggies and a hearty bun, and you've got everything you need. And thanks to the burger bag method you have less prep, less mess, better nutrition and great taste.    


Burger Bag Cheeseburger

Ingredients:

1 lb ground turkey
1/4 cup diced onion
hamburger seasoning
3/4 cup shredded cheese
buns

Instructions:

1. Preheat oven to 400 degrees
2. Evenly spread onion on the bottom of 8x8 baking dish.  Sprinkle with hamburger seasoning.
3. Open Burger Bag or gently press fresh meat onto onions and seasoning as evenly as possible 
4. Poke holes in meat with straw or fork and sprinkle on more hamburger seasoning.
5. Bake for approximately 18-20 minutes.
6. Remove from oven and pat/drain off grease. Sprinkle with cheese.
7. Bake for two to three more minutes,  until cheese has melted
8. Slice into patties and serve

Serve with desired toppings (Heaven on Earth with an onion slice) and ENJOY

xo, 
Brit

Read More

Freezer Hack: Burger Bags

Hello! Today I'm here to talk about...well, meat. Perhaps that doesn't seem too exciting, or even appealing, but hang with me. I'm excited to share this freezer trick.

I was never a fan of buying meat in bulk, freezing, and defrosting.  I enjoyed my frequent trips to the store to pick up fresh food.  And besides, defrosting took FOREVER and I'd end up with a questionable hunk of meat that was half thawed, half icy. Um, no thank you.

But then I realized two things. One, I now had kids and those frequent grocery stops were not realistic. And two, I was freezing and defrosting the meat ALL WRONG. 

So I came up with a solution and solved all my thawing woes. Now, I can't live without freezing meat!

I call them "burger bags."

Place 1 pound of hamburger into a freezer gallon size Ziploc bag.  Seal the bag and press the meat flat into approximately an 8" square.

(No need to grab the tape measure. This ends up being about 3/4 the width and height of the gallon ziploc bag). 


Freeze burger bag like this

It's easy to store in the freezer, it thaws SO MUCH faster, and once defrosted, you're all set to make the most delicious burgers. 

To defrost, I simply place bag in fridge. Typically the day before I plan to use it. 

Now let me show you why these are truly called burger bags. 

Lay thawed bag flat on counter. Tear away the top layer of ziploc bag. Lift the meat by placing hand(s) under the bottom layer of ziploc.  Flip square patty right into baking dish. 


When ready to use frozen meat, place in fridge until defrosted. Then open bag, lift and flip right into dish
No more handling raw meat and raw juices all over the counter.  And easy enough to prep with kids running underfoot. Oh and clean up? Toss the bag away.


Hope you find this trick helpful.  And now that your meat is in the baking dish, let's make some burgers!

xo,

Brit

Ps. Even though they're called burger bags, I freeze all my ground meat (beef, turkey, chicken, etc.) in freezer bags this way. It really does thaw faster and more evenly, maintaining the taste and quality.
Read More

Pineapple Salsa

Thursday, July 23, 2020


Here come the pineapples 
(shake shake shake)...
And then they jump de jump de jump
Jump de jump jump into the bowl
And then they jump de jump de jump
Jump de jump jump into the bowl
All for the fruit salad salsa
--Fruit Salad Salsa by The Laurie Berkner Band

I can't help but to sing this song as I mix up this Pineapple Salsa.  The Laurie Berkner Band is one of our all time favorites in this house. My kids and I have some pretty entertaining dance parties to her music. 

And just like her catchy song, this recipe is set on repeat. It's so good! 

This easy pineapple salsa is the perfect combination of juicy sweetness combined with crisp, colorful vegetables. Serve as a dip, side dish or on top of chicken, fish or pork.   

And if you're like me, you like to make festive dishes as fast and with as little prep as possible.  This recipe is based on ingredients I keep on hand, which minimizes purchasing specialty items and saves time prepping. All while maximizing color, nutrition and flavor. 


Canned pineapple has so much potential and this recipe certainly lets it live up to it's flavor. I do suggest buying name brand pineapple  (like Dole or Del Monte) if possible. You definitely want quality color and flavor.  And opt for chunks. Of course you could use tidbits and spare the chopping but trust me, it's worth the time. And still easier and cheaper than a whole pineapple!

Once you have your vibrant pineapple pieces, toss in chopped onion, bell pepper, and tomatoes. Oh how the colors radiate in this dish!  And what a tasty way to mix in fresh, crisp nutrition. For me, I typically keep these veggies on hand and often prep them at the beginning of the week, making this step is a breeze. Choose any color(s) of bell pepper to add to the rainbow.  And you can use any variety of onion, but red onion is the sweetest. Plus that purple color is undeniable!  Any chopped tomato works but my favorite are smaller sized ones, like cherry or grape, diced into even smaller pieces. They look and taste awesome.


But yes, I did say ANY chopped tomato works. You can even use canned tomatoes. 


This is a great shortcut as a way to use up the last bit of diced tomatoes you may have opened for a previous dinner recipe. The trick is to get rid of any liquid. Drain them thoroughly and blot the excess juice off before tossing them into the dish.  And while delicious, I'd say this is best on top of a meat versus dipping into as a fresh dip. 


Pineapple salsa made with canned diced tomatoes and diced orange bell pepper

Now for some greenery. And a boost of nutrition and color.  No, I'm not talking about cilantro. Well, that's technically in here too, but I'm taking this opportunity to do what I love. Sprinkle in that spinach! 


Unless you have cilantro growing in your garden, buying a bunch is an an added expense and some may go to waste. I use dried cilantro instead. It sprinkles in perfect flavor and I always have it on hand.


Shake in a few other spices from the pantry--- garlic powder, ginger, salt and pepper. Splash with lemon and or lime juice and give it a stir.  Again, I keep bottles of real lemon and lime juice available in the fridge for recipes such as this.  An easy way to save time, mess and waste.


Make this sunny dish as customized as you desire. Toss in all fresh ingredients or a mixture of fresh and shelf stable.  You can add, subtract or swap out. And if you can wait, let it chill in the fridge for 20-30 minutes for optimal flavor. Either way, I hope I inspired you to create an easy salsa that's festive, delicious, and nutritious.


Before you know it,  you'll be singing along too...


"And everybody goes in and shake shake shake
And everybody goes out and shake shake shake
And everybody goes in and shake shake shake..."

...All for this PINEAPPLE salsa!


Pineapple Salsa


Ingredients

3 cups canned pineapple, diced into small pieces

1/3 cup tomatoes, diced into small pieces
1 cup bell peppers, diced 
1/3 cup red onion, chopped
1/3 cup fresh spinach, chopped
Salt, to taste
Pepper, to taste
2 tablespoons dried cilantro
1 teaspoon garlic powder
1/4 teaspoon ginger powder
2 tablespoons lemon juice or lime juice

Instructions

1. Add pineapple, onion, bell peppers, spinach, salt, pepper, cilantro, garlic, ginger, lemon/lime juice in a large bowl.
2. Mix ingredients together.
3. Cover and chill for 20-30 minutes in fridge.

Notes:

  • Store leftovers covered in fridge for 1-2 days. Give a stir before serving as it may become more watery as sits. 
  • Like the heat? Add red chili flakes or jalapenos
  • Like it sweet? Swap out tomatoes for strawberries.  Same color, similar texture, SO good! 

Enjoy!

I'd love to know if you make this. Follow @briefandbalanced on Instagram or Facebook, snap a photo and tag me. Thank you! 


Read More

Strawberry Banana Bread Muffins

Saturday, July 18, 2020


Hello!  Can you believe July is half over? I've personally enjoyed this month thanks to the busier pace over here. It's felt a lot more like summer. For one, I've gotten back to my Fit4mom classes.  For anyone wondering, Fit4mom is a fitness group for mamas and kiddos. And what a godsend! I've always viewed it as that, but especially now.  It feels so "normal" to rush out the door in the mornings. I savor the fresh air, beautiful shaded park, and hearing my kiddos sing along with others.  Socializing can be so hard during this stay at home lifestyle. These mornings are truly special and I'm forever grateful for this community. 

So with early mornings and getting everyone (and everything) out door, I've been relying heavily on grab and go breakfast options.  Today's tasty muffin mix recipe fits right into those mornings.

And the combination of banana and fresh strawberries fit right into the summer season.

These strawberry banana bread muffins are tender, moist and delicious.  Bite into the banana flavor you love and get the nutrition from protein rich yogurt and fresh strawberries. Enjoy the convenience with a touch of homemade.  Best of all, they’re super easy! Open a box of muffin mix for a delicious breakfast or mid afternoon snack. 

Muffin Mix Made Easy


Oh, how I love a good box of muffin mix.  Talk about a tasty time saver with infinite possibilities!  And for someone who doesn’t love baking from scratch (that’s me), these boxes are like gold. They save time, money, and the flavors are endless! If you have specific dietary needs, there's guaranteed to be a box for you.  I’ve seen everything from sugar free and gluten free to wheat free and organic. 

And the best part? Mixes are sold everywhere.  I snagged one the other day at Walgreens while picking up photos!

While I don't have any dietary restrictions, I do pay attention to the sugar content.  I was shocked one day when I flipped over the banana bread box from Trader Joe's to see the nutrition facts.  Basically, a whole day worth of sugar in one serving. The FIRST ingredient was sugar!  My love for TJ's runs deep so it pains me to share this.  But since their products are often high quality, one can easily mistaken that for "healthy." Obviously that wasn't the case here. Sugar is everywhere. Flip over the box before tossing it in the cart. Don't stress over the Ingredients, but if you have a choice, I encourage buying the better option. 

Two brands I suggest are Pillsbury Quick Bread and Krusteaz baking mixes.  Nutritionally, they tend to be a bit more balanced.  But shop around. And remember, what you add to the muffins will also create an better bite.


Strawberry Banana Muffins Made Better


Customizing muffins with your favorite add ins quickly transforms a prepared mix into a homemade masterpiece.  Fruits, yogurt and nuts blend well and add so much good. 

The greek yogurt provides great taste and protein. Starting the day with protein is so important. It fuels the mind and body while helping to maintain our blood sugar. My kids love these muffins and I love the nutrition.  I also love how moist and fluffy they are. If you haven't used greek yogurt in your muffins (or any baked good really), you're missing out.

You're also getting fiber, vitamin C and antioxidants thanks to the chunks of fragrant, juicy fresh strawberries. Mix them into the batter or toss them on top for a beautiful pop of color. Such a sweet way to start the morning. 

And there is one secret ingredient-- powdered peanut butter.  I love PB2! It's another easy way to up the protein.  And since I usually spoon peanut butter on warm muffins anyways, I sprinkled this in for the taste and nutrition.  It's mess free and perfect for on the go.    This ingredient is completely optional but a great example just how you can make a mix any way you want it. 


Strawberry Banana Bread Pancakes


Have you ever made pancakes from muffin mix?  It's the best and so easy! The true definition of sheet pan pancakes-- Pour, bake, and flip right onto your plate.  Or flip into an airtight container for a delicious option all week long. Full of flavor, moist and fun to eat. 

Simply prepare the batter as directed in the recipe, pour batter onto baking sheet and bake at 400 degrees for 5-8 minutes. 


How to make Strawberry Banana Bread Muffins


Skip the measuring, the mess and cleanup.  All you need is a box of banana flavored bread or muffin mix, greek yogurt and fresh cut strawberries.  Combine the muffin mix and yogurt with water and stir until blended. Pour into pan and top with fresh chopped strawberries.  

Bake until light golden brown and toothpick inserted into the center of muffin comes out clean. 

With this recipe, you don't have to be team muffin or team pancake.  You can do a little bit of both! I can usually get 10-12 muffins and a sheet of pancakes out of this recipe, depending on size.  You can choose how big you want to make muffins and pancakes, just note that baking time and consistency may slightly vary. 


Strawberry Banana Bread Muffins


Ingredients:

1 box of banana flavored quick bread mix (or muffin mix)
1 cup greek yogurt
1 cup water
fresh strawberries, sliced
1-2 tablespoon powdered peanut butter, optional

Instructions:

1. Preheat oven to 400 degrees.  
2. Combine all ingredients (except strawberries) in mixing bowl and stir until combined
3. Prepare muffins or pancakes by the following steps:


Muffins

  • Grease muffin tin or use liners
  • Fill muffins 1/2-3/4 way full
  • Top with strawberries
  • Bake for 15-20 minutes, until toothpick comes out clean

Pancakes

  • Line baking sheet with foil and lightly grease
  • Pour 1/4 cup batter directly onto pan, allowing for some space between each pancake
  • Top with strawberries
  • Bake for 5-10 minutes, until lightly brown 
Enjoy warm or allow to cool and store in airtight container in the fridge

Notes:
  • For best results, bake muffins directly in greased muffin tin. Liners make for easy cleanup but muffins will stick
  • Warm in microwave for 15 seconds prior to serving from fridge 


I hope this recipe brings a better balance to your morning. It sure helps us! After all, an easy morning sets the stage for a great day.  Enjoy!

xo,
Brit


Read More

Freezer Friday & Four tips to maximize your fridge

Friday, July 10, 2020


Happy Friday!  I'm going to keep this short and sweet just like how the day before the weekend should be.  And I also need to get back to my computer work... aka scrolling local restaurant menus to decide what's for dinner tonight. What's your favorite takeout? I'm pretty indifferent because 1) it's food and 2) I don't have to make it!

With the weekend approaching, it's easy to get a bit lazy in the kitchen. I know. I, too, would forget about leftover food in the fridge and come Monday, I'd play a game called "what's inside this container." Not always the most pleasant way to start a new week. But I've got a good system down now.  And I'd like to introduce to you my strategy, "Freezer Friday." 


With four easy steps you can quickly maximize what's in your fridge.  Follow this each week and you'll reduce waste, keep your frozen foods fresh and stocked all while forming meal prep ideas and creating your shopping list. 


You know what I say to that? TGIF!!


Four tips to maximize your fridge


1. What do I need to use?

Ask yourself this as you look high and low (and behind items) in your fridge. Do you have fresh veggies lingering in a container from earlier in the week? Think of ways you can use them over the weekend.  Examples include the following: throw in scrambled eggs on Saturday morning, toss into pasta salad on Sunday or even sprinkle on top of a frozen pizza tonight.  

Taking a quick inventory minimizes the chances of them getting pushed to the back only to discover the smell a couple weeks later.  And if you don't think you might use an item, jump to step 2. 


2. What can I put in my freezer?

This is my favorite step (hence the name, "Freezer Friday"). Make your freezer your best friend. Keep freezer storage bags on hand, and toss whatever in it (labeling it, of course). Do you have a couple servings of lasagna left? Put it in the freezer. After you look in containers, open up the veggie and fruit bins. Is your fresh spinach starting to go? Put it in the freezer (and even if it's not, toss it in the freezer--now you have plenty of spinach on hand for next week's smoothies and baking. Just don't forget to replace it in step 4).  

So many things can be frozen. Even lemons, herbs, etc. can all be prepared and kept for later use.


3. Think ahead

As you add to your freezer, take inventory. Do you already have spinach in there? Move that to the front and place your new addition behind it.  Look at your meat.  How can you use that ground turkey this coming week? Knowing what's in the freezer not only helps you plan meals but also identify what day you need to start defrosting, if necessary.  There's nothing worse than knowing Wednesday is ground turkey tacos but then come Wednesday, you remember the meat is still frozen.   Also, make sure you always have a couple "staple" items frozen for a last minute, nutritious meal. Because, yes, plans do change. You can use my #MealMakeoverMonday posts for inspiration. 

All in all, this step jump starts my meal planning for the week and adds to step 4, the grocery list.


4. Make a Shopping list


As you move things around in your fridge and freezer, jot down items you need on a list. Don't forget to scan items like condiments, salad dressings, butter, and eggs as well.  If something is getting low, move it towards the front and write it down.  You've already identified what's in your freezer for meals so add anything else to the list that you need for those. Hang that list up and now it's ready for the next outing or online order.  

Easy, right? A brief moment today helps start next week off on the right foot. And since it's not even the weekend, you're way ahead of the game. Make it a "Freezer" Friday, Friends!

xo,
Brit
Read More